Custom Nodes
RustEdit ProA custom node is a group of nodes saved as one node. You place it in any graph like a normal node. When you change a custom node, every graph that uses it gets the change. Use custom nodes to keep big graphs tidy, and to reuse a set of nodes you build often.
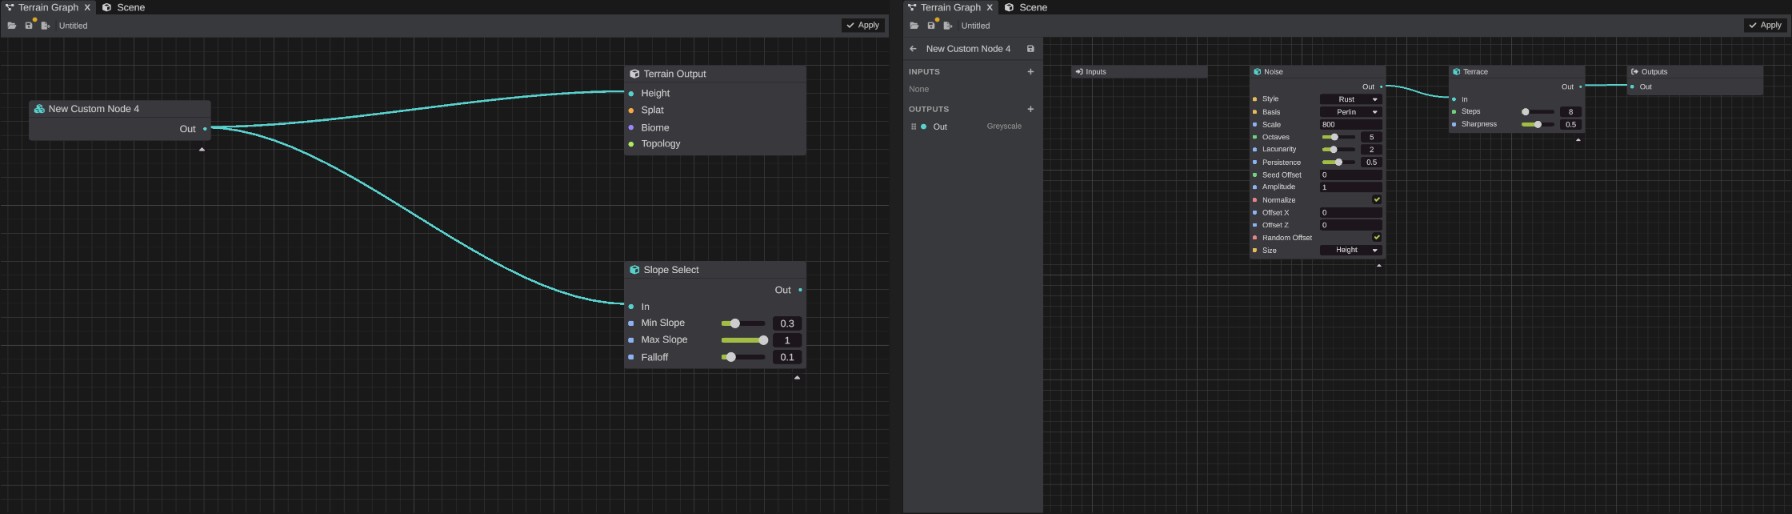
Make a custom node
From nodes you already have
- Select the nodes. See Select nodes.
- Right-click one of them and pick Create Custom Node. The nodes are replaced by one custom node, called New Custom Node, with a number added if that name is taken. Rename it in the sidebar when you open it.
RustEdit works out the custom node's ports from the wires:
- Every wire that came into the selection becomes an input. A value that fed several selected nodes becomes one input.
- Every wire that left the selection becomes an output.
- The new custom node is wired to the same nodes as before, so the graph gives the same result.
The Terrain Output node is never taken into a custom node. The swap is one undo step. Undo puts the nodes back, but the custom node stays saved in your Custom Nodes folder.
Empty
- Right-click the empty canvas and pick New Custom Node. RustEdit places a custom node and opens it. Inside, the Inputs node has one port called In, wired straight to the Outputs node's port called Out. Both are Any Texture ports.
- Build the nodes you need between them.
Edit a custom node
- Double-click a placed custom node, or right-click it and pick Edit Custom Node. The canvas shows the custom node's inside, and the sidebar opens on the left.
- Edit the nodes inside like any graph.
- Click the back arrow in the sidebar to go back to the graph it is used in. RustEdit saves the custom node on the way out.
Inside a custom node:
- The Inputs node gives what is wired into the custom node's inputs. The Outputs node takes what the custom node gives out. There is one of each, and you cannot delete or copy them.
- Every node runs, even if nothing is wired to the outputs yet, so you can see node previews while you build.
- The preview on the terrain keeps running. Graphs further out use your changes at once.
- A custom node can hold other custom nodes. Open one inside another, and the back arrow steps out one level at a time.
- The Terrain Output node is not offered. A custom node is not offered inside itself.
The first time you open a custom node, the view fits all of its nodes. After that, each level keeps where you panned and zoomed.
The sidebar
| Part | What it does |
|---|---|
| Back arrow | Leaves the custom node and goes back to the graph it is used in. Saves the custom node. |
| Name | The custom node's name. Use a slash to put it in a folder of the Add Node menu: Math/Remap shows as Remap under . Two custom nodes cannot have the same name: RustEdit adds a number. |
| Save | Saves the custom node. A dot on it means there are changes that are not saved yet. |
| Inputs | The ports on the left of the custom node. Click + to add one, then pick its type. |
| Outputs | The ports on the right of the custom node. Click + to add one, then pick its type. |
Each port is one line in the list:
- Click the line to show the port's settings: Type, and for number inputs Default and Range.
- Double-click the name to rename the port.
- Drag the handle on the left to move the port up or down on the node.
- Point at the line and click the remove button to remove the port. Wires to it are removed too.
Port types
| Type | Carries |
|---|---|
| Any Texture | A map of any width. It takes the width of whatever is wired in. |
| Greyscale | One channel: a height map, a mask or a noise. |
| RGBA | Four loose channels. |
| Biome | The biome layers. |
| Splat | The splat layers. |
| Topology | The topology flags. |
| Float | A decimal number. |
| Int | A whole number. |
| Bool | On or off. |
For a Float or Int input, set Default to the value the input starts at when you place the custom node. Set both Min and Max in Range to give the input a slider. Values outside the range are clamped. Leave them empty for no range.
Save custom nodes
- Click Save in the sidebar, or press Ctrl+S.
- RustEdit also saves the custom node when you leave it with the back arrow, when you close the Terrain Graph window, and when you rename it.
Every graph that uses the custom node reads the saved version. Placed copies update their ports to match.
When you add, remove, rename or retype a custom node's ports, placed copies of it go back to the default values on their number inputs. The undo history of the graphs that use it is also cleared.
Make Unique
All the placed copies of a custom node share one file. To change one copy without changing the others:
- Right-click the placed custom node and pick Make Unique. RustEdit copies the custom node into a new one called "... Copy" and points this node at the copy. Its wires and typed-in values stay.
- Edit the copy.
Where custom nodes are kept
Each custom node is one .terrainnode file in the Custom Nodes folder. By default, this is the CustomNodes folder next to the RustEdit app. To use another folder, set Custom Nodes in the Paths settings, then restart RustEdit. See Settings.
The file name is a code, not the custom node's name. The name is stored inside the file. RustEdit does not show which file holds a custom node. To find it, open the files in a text editor: the name is near the top, on the line that starts with "name". A text editor's search in files finds it fastest.
Share custom nodes
A graph file does not hold its custom nodes. It only points at them by their code. If the custom node is missing, the graph shows a node called Missing Custom Node, and it gives nothing.
To give a custom node to someone:
- Find its
.terrainnodefile in your Custom Nodes folder. - Send them the file. If the custom node holds other custom nodes, send their files too.
- They copy the files into their own Custom Nodes folder, then restart RustEdit. RustEdit reads the folder once a session, so a file added while it runs shows after a restart.
To share a graph, send the .terraingraph file together with the custom nodes it uses.
Delete a custom node
RustEdit has no command to delete a custom node. To remove one, close RustEdit, then delete its .terrainnode file from the Custom Nodes folder. Graphs that use it then show Missing Custom Node.
Limits
- Custom nodes can be nested up to 8 deep. A custom node deeper than that, or one that holds itself, gives nothing, and RustEdit logs a warning.